|
Professional Photoshop WorkFlows Techniques The main goal of digital color imaging is to CAPTURE as much color information as possible, and to PRESERVE that color information throughout the editing processes. That said, nothing is more damaging, destructive to color information than editing it. Whether we do the editing, color correcting, image adjustments in Photoshop's Curves, Selective Color, Levels, Channel Mixer, Hue/Saturation, or Color Balance — we need to develop strategies of high–bit CAPTURE and least–destructive color PRESERVATION. The high–bit, 16–bit scanning Workflow and Adobe's Camera RAW Photoshop plug-in provide high–bit capturing methods, but this how to tutorial is about the least–destructive editing methods, specifically, Photoshop's Adjustment Layers. The first "rule" to learn is:
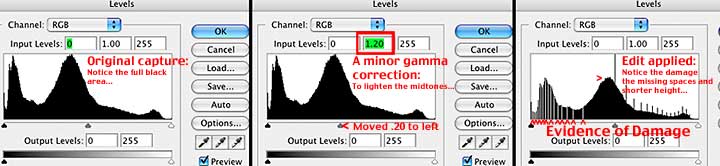
We can witness this fact first hand in Photoshop's Levels, Histogram:
Original Capture: Notice the full (healthy) continuous black area — this is what we want. In a digital image, those holes, blanks, gaps, missing areas represent posterization in the image. Make a couple more minor Edits — outside of Adjustment Layers — and it is easy to see how quickly even slight moves add up in Photoshop to significant image degradation. +++++++ ENTER ADJUSTMENT LAYERS:
DOWNLOAD a Working G BALLARD Production File: Current Production–Grade Quality — 6x9 inches production scan.
|
||
| Terms of Use • Privacy Statement • Site Map Home • About Us • Mission Statement • Press Kit • Contact Us |
||

 I like to visualize adding an Adjustment Layer in Photoshop is like adding a photographic filter over a camera lens (or adding a color-correcting gel over a photograph to evaluate the adjustment).