ASSIGN Versus CONVERT to Profile
Photoshop Color Management Tutorial
by Gary Ballard, color management consultant, San Diego, Calif.
Adobe® Photoshop® is a registered trademark of Adobe Systems, Inc.
PHOTOSHOP -- any color management system (CMS) or application -- cannot display, print or convert a file accurately unless it first applies the file's source profile (i.e., its Source Space, ICC profile, ColorSync profile, Color Space).
There are only three ways Photoshop (or any application) can apply a document's source profile:
- The file is "tagged" with an embedded ICC profile, we HONOR (use) the embedded profile.
- We Photoshop Edit> ASSIGN the correct source profile (or set up the CMS to Assign the correct profile by work flow default settings).
- The file's source profile EQUALS Photoshop's working space (by chance or by work flow) and it is correctly assumed -- and/or -- the source RGB 'numbers' are simply "passed through" unaltered in the correct target destination profile 'language'.

In color-managed programs like Photoshop, the CMS reads the source profile and Converts (or transforms) the document colors to a specific destination device Profile (source> monitor profile, or source> printer profile) for accurate "proofing."
On the Source> Monitor side of the color theory — this Converting or transforming process is most easily proven by taking a screenshot of an open Photoshop document, then opening the screenshot in Photoshop and "Assigning" the monitor profile to the screenshot because the monitor profile is the only ICC profile that restores the document's so-called Photoshop 'true color.'
Unmanaged apps generally only pass through the source RGB "numbers" unalterd to the monitor or printing software.
So proofing accuracy in unmanaged work flows will depend if the source profile "matches" the application or system default profile (and if a proper conversion to the specific proofing space happens after that).
Or if the source profile was previously converted to "match" the specific target proofing space (monitor or printer ICC profile) and if the application successfully passes through the source numbers to the proofing device unaltered.
At this point it may be good to review my basic Photoshop Color Management theory and terminology paper.
Or skip down page to my actual Convert-Assign TUTORIAL for my "Five Simple Steps to Profile Enlightenment."
|
This online Photoshop tutorial uses the CS6 CS5 CS4 CS3 PSCS2 CS1 PS12 11 PS10 PS9 PS8 PS7 PS6 Assign Profile Convert Profile features to explain how to Honor embedded profiles and Convert to target destination profiles like print spaces, iPhones, iPads, Droid, Blackberry smart devices and the Web through Adobe Photoshop color management theory.
|
| Remember PHOTOSHOP'S GOLDEN RULES: |
|
If the image has an embedded ICC profile:
- ALWAYS "Use the embedded profile," then Convert to the profile you want (if you need to change profiles).
If the image does not have an embedded profile:
- ALWAYS "Assign" the ICC profile that looks best on your 'calibrated' monitor, then Convert to the profile you want (if needed).
If your monitor is not accurately 'calibrated' (profiled), Photoshop and apps will be skewing the monitor color, so be sure to profile your monitor so you can trust what you are seeing in color-managed applications like Photoshop.
|
"It is the theory that decides
what we can observe."
- Albert Einstein
|
|
What is the best profile to use in Photoshop?
Adobe RGB 1998 and ProPhoto RGB profiles are excellent professional RGB working spaces (if you understand what you are doing), but sRGB is by far the most common and "safest profile" to use both in and outside Photoshop because sRGB is the default profile standard for Windows and Apple OSX 10.7 operating systems and the Internet.
My document is "untagged" what profile should I use?
If the image does not have an embedded profile — Photoshop: Edit> Assign Profile: sRGB IEC61966 2.1 is a good first guess for RGB (or "US Web Coated (SWOP) v2" for CMYK) — because they are Photoshop's North American default profiles and the most common color spaces.
How to simply Convert images to sRGB:
If you just need the short answer to learn about how to simply Convert RGB photographs to sRGB:
- 1) Open the image in Photoshop (use the embedded profile) or Edit> Assign the correct profile, then
- 2) Edit> Convert To Profile: (select) sRGB profile (and Save).
|
| ASSIGNING Vs CONVERTING PROFILES |
What is the difference between Photoshop's "Assign Profile" and "Convert to Profile" color editing tools?
There is a HUGE difference between Photoshop's Assign Profile and Convert to Profile (if you want to apply or change Profiles)...
- In Photoshop, to apply a profile, "Use the Embedded Profile" when opening the document, or Edit> Assign Profile: correct Source Profile.
NOTE: Photoshop Edit> Color Settings> Color Management Policies should be set to "Preserve Embedded Profiles" so Photoshop automatically uses the embedded profile (if there is one). If the image is un-tagged, we will need to manually Assign the correct profile.
- In Photoshop, to change a profile, Edit> Convert to Profile: Destination Profile.
NOTE: In order to properly "change" a Profile, we need to be certain we have FIRST applied the correct Source Profile by application Default, Color Settings, color-managment Policies, or Assign Profile — THEN — Convert to the desired Destination Profile.
Many users have trouble understanding when to use Assign Profile and when to Convert to Profile — please exhaust your review of this Assign-Convert tutorial because it lays the cornerstone of the theory, and you will never understand how color management works without a 100-percent grasp of these two basic functions.
|
|
Three ways to use the best Source Profile in Adobe Photoshop:
|
1) HONOR (use) the Embedded Profile:
Using the embedded profile is REQUIRED (if we are opening an RGB or CMYK file in Photoshop)!
THE FACTS ARE if we ignore or disregard the embedded profile, we change the file the moment we open it...please read my FACTS link if you think ignoring or stripping embedded profiles or attempting to turn color management off are good ideas.
As the late Bruce Fraser creativepro.com explained in an Adobe Forum:
"I've seen more files wrecked by people opening perfectly good tagged files and either stripping the profile deliberately, having the software set up to discard the embedded profile, or using some antediluvian version of Photoshop that doesn't understand profiles, than from any other cause...".
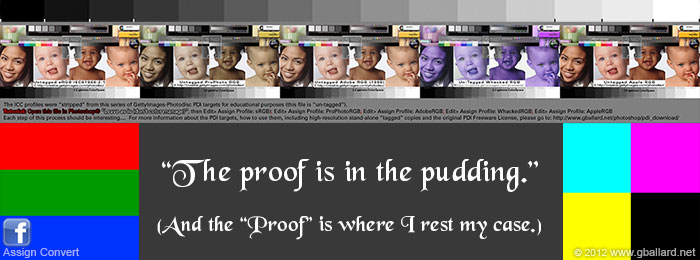
Here is a dramatic example of that phenomenon:
SEEING IS BELIEVING...
use a color-managed Web browser like Safari of Firefox |
|
This example demonstrates what happens to color when ICC profiles are ignored and/or the wrong default profile is sent straight through to the display:
Move mouse over photos to rollover the Untagged version.
If the rollover looks exactly the same (blue), your Web browser is not color managed (use a color-managed browser for best results).
Both Tagged and Untagged files are identical except the top Tagged image has an embedded ICC profile, and its Untagged rollover mate has had its profile "stripped" for this tutorial...FULL WEB TUTORIAL.
|
|
2) Photoshop> Edit> ASSIGN Profile:
There are ONLY two times we use ASSIGN Profile:
1) The file is Untagged (we must tell Photoshop the file's correct Color Space). Generally, most un-tagged RGB files will be closer to sRGB (Edit> Assign Profile: sRGB) because sRGB is the most popular default profile and it is a closer match to most monitors.
2) The file looks bad on a calibrated monitor (the file is mistagged, or balanced on an inaccurate monitor). We use Photoshop to look for a better ICC profile, one that displays the file better on an accurate, 'calibrated' monitor. After we Assign the best profile, then Edit> Convert to Profile: the desired profile (if needed).
|
3) Source Space EQUALS Working Space/Default Space:
There is ONLY one way a file's Source Space can EQUAL Photoshop's Working Space:
1) The file was last saved — tagged or untagged — in Photoshop's current Working Space.
|
PASSING THROUGH RGB 'NUMBERS' UNCHANGED
a side-bar point: |
|
Unmanaged applications generally "Pass Through" RGB to the display monitor — for example — Adobe Fireworks, Dreamweaver, After Effects, Apple's Final Cut Pro, Microsoft Word and most Web browsers do not read embedded profiles, they are not "color managed":
- Likely all Web browsers (except Firefox with its "Full Color Management" enabled) do not alter untagged Photoshop .jpg files, System colors or Hex colors specified in CSS and HTML — those applications simply pass the RGB 'numbers' straight through to the monitor unchanged.
- The engineering "presumption" is that the color standard equals the Operating System's default color space (sRGB) for display on sRGB-compliant devices. Of course, that presumption is correct and accurate only when the Monitor RGB "matches" sRGB — and most Monitor Spaces do not "match" sRGB — but the current default standard profile is sRGB because that's how the Windows and recent Apple operating systems (10.7, 10.8) and the Internet are being developed.
Example to illustrate my "Pass Through" point (use a color-managed Web browser like Safari or Firefox).
Some Windows PC browsers and all unmanaged browsers will "match" the Tagged and Untagged rollovers to the background color because all three elements are based on one Color Space (sRGB), but the color will only display "accurately" on the elements that are being fully color managed (ie, sRGB profile is Applied and Converted to the Monitor Profile). This will be extremely confusing until you understand the simple basic concepts at work — then a light bulb will turn on and this example will make it super easy to observe what's happening inside your test browsers (how they react to Default Color Spaces and embedded Profiles):
COLOR CONSISTENCY vs. COLOR ACCURACY
A real problem for Web designers and color-managed Web browsers is mixing tagged and untagged color where the graphic background needs to "match" or blend seamlessly into an HTML background color. The choice really boils down to designing Web pages for color consistency or color accuracy (Firefox with its "Full Color Management" enabled achieves both)....
- The above HTML box is filled with Hex-specified AF641E color — in most if not all Web browsers the Hex color is being sent straight to the monitor unaltered (except Firefox with its "Full Color Management" enabled).
- The Photoshop logo backgrounds are filled with the exact same AF641E.
- The tagged and untagged pixel-based logo graphics are identical except one has an embedded sRGB profile and the other had its profile stripped for this example.
- The untagged logo RGB numbers are being sent straight to the monitor unaltered in most if not all Web browsers (except Firefox with its "Full Color Management" enabled).
- The embedded profile in the tagged logo file — in all fully color-managed web browsers — is being read and Converted to the monitor profile for accurate display. Non-managed browsers ignore the embedded profile and send the RGB straight through to the monitor unaltered.
If you are trying to achieve this seamless blending effect on the Internet, be sure to first merge any Photoshop adjustment layers and then Edit> Convert to Profile: sRGB (if not already there) BEFORE setting your Hex color(s) in Photoshop, then Save for Web without an embedded ICC profile. Then set the same Hex color in your CSS HTML.
If you are not crystal clear on how your apps or devices Assign/Assume/Apply or Pass Through RGB color spaces (the point I am exhausting here), I will recommend figuring it out now BEFORE trying to go any further with the theory because it lays another cornerstone to conceptualizing basic color management theory — and you will be lost without a 100-percent grasp of this Default and Pass-Through concept.
|
BEGIN ASSIGN-CONVERT TUTORIAL
Five simple steps to profile enlightenment: |
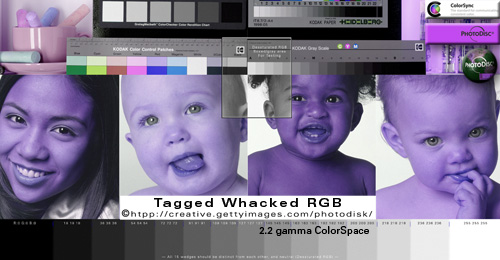
1) DOWNLOAD THE TUTORIAL PHOTOS
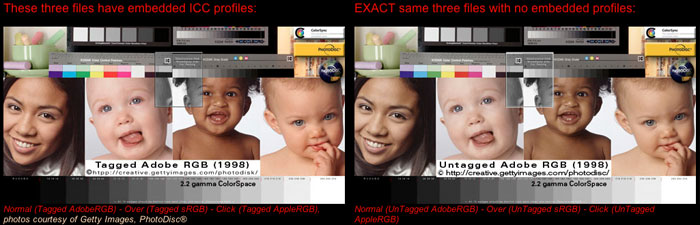
My original HONOR, ASSIGN, EQUAL points are very easy to PROOF in Photoshop using the low-resolution PDI test images I set up for this tutorial:
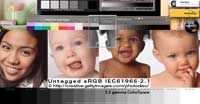
DOWNLOAD the iPhotoTESTfolder.zip (5MB) for Mac OSX & Windows PC.
iPhotoTESTfolder contains a collection of ten .jpg files — one reference image in five different Color Spaces in "tagged" and "untagged" pairs. I set these files up to effectively demonstrate how different color profiles, color spaces, gammas react on screen in both color-managed and un-managed applications.
Each Tagged-Untagged pair is IDENTICAL except the Tagged file contains an embedded profile, and its Untagged mate had its profile stripped.
The above 10 iPhoto test images are also useful to bring into in digital apps like Aperture, Bridge, Finder, Apple Preview, Lightroom, Final Cut Pro, iDVD, After Effects, Premier, Windows Explorer, Picture Viewer and observe how each application deals with various color spaces and profile information.
BOUNS: Here are five tagged high-resolution 300 ppi, 10-inch images for your reference library — AppleRGB, AdobeRGB, sRGB, ProPhotoRGB, WhackedRGB — including the full unaltered original PDI_Target.jpg PhotoDisk PhotoDisc PDI image, plus the GettyImages®, PhotoDisc® freeware license, copyright and production credits:
DOWNLOAD ALL THE PDI high-resolution reference images -- now with WhackedRGB and ProPhotoRGB targets, including WhackedRGB.icc!
|
2) SET PHOTOSHOP'S COLOR SETTINGS
Go to Photoshop's Edit> Color Settings and set "North American Prepress 2" (for the tutorial to get us working off the same settings).
If you are using an older version of Photoshop, and Color Settings is not available there — try Photoshop> Color Settings> Settings> "US Prepress Defaults".
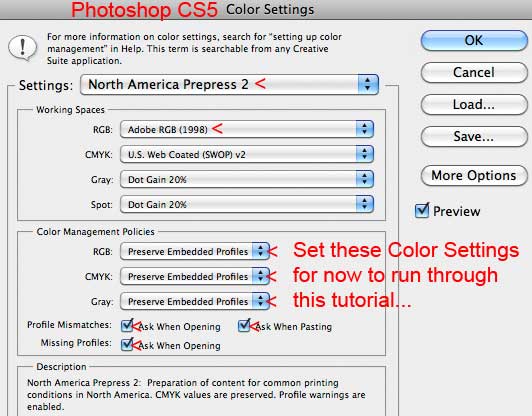
All three "Preserve Embedded Profile" and all three profile boxes are "checked" — these Color Management Polices close Photoshop's BackDoor — this means all embedded profiles will be "Preserved," and Photoshop will "Warn" us of any profile mismatches.
Bruce Fraser quote about Photoshop's Color Management Policies settings:
- "The safest starting point is to set all Color Management Policies to Preserve Embedded Profiles, and to turn all warnings on. The other two policies change either the numbers in the images or the interpretation of those numbers automatically, which is great if that's something you understand and want to happen, but confusing at best and disastrous at worst when you don't. The warnings give you a moment's pause to consider the situation, and to act accordingly."
When you are finished with this tutorial, remember to reset your Working Spaces (sRGB is recommended unless you know what you are doing), but please do follow Bruce Fraser's recommendation about keeping these Color Management Policies in play.
|
|
3) Open the five Untagged iPHOTO test files as noted:
adobeRGB_Untagged.jpg, appleRGB_Untagged.jpg, srgbRGB_Untagged.jpg, prophotoRGB_Untagged.jpg, whackedRGB_Untagged.jpg
At each Missing Profile warning: "Leave as is (don't color manage)":
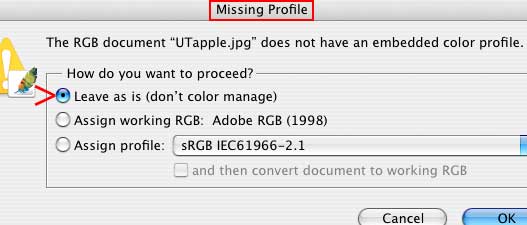
With all five Untagged files open, notice Photoshop is displaying only the Untagged Adobe RGB file correctly because Photoshop is making the correct Assumption based on "Working RGB EQUALS Adobe RGB."
Moreover, observe the other four Untagged files are displaying uniquely incorrect.
This is because we told Photoshop to "Leave as is (don't color manage)" the images — that has the same effect in Photoshop as Edit> Assign Profile: Working RGB (Adobe RGB 1998). Hence, that was the correct move only for the Adobe RGB file.
In other words, when we configure Photoshop to ignore embedded profiles or we don't give it a profile to use, Photoshop Assigns its Working Space to the source image (for all practical purposes).
|
|
4) Open the five Tagged iPHOTO Test files
HONOR the embedded profiles as noted: adobeRGB_Tagged.jpg, appleRGB_Tagged.jpg, srgbRGB_Tagged.jpg, prophotoRGB_Tagged.jpg, whackedRGB_Tagged.jpg
At each Embedded Profile Mismatch warning: "Use the embedded profile (instead of the working space)":
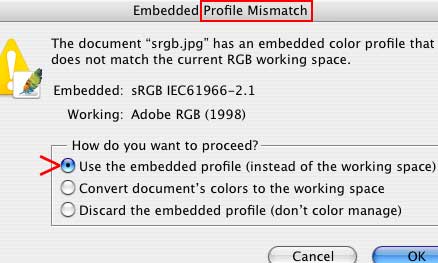
All five Tagged test files look identical to the Untagged AdobeRGB BECAUSE they are all being correctly Converted into Monitor RGB — Photoshop knows the files' Source Spaces by reading their embedded profiles, and the CMS is re-mapping (correcting) the color to the monitor space automatically behind the scenes. This is sometimes called display with "monitor compensation."
|
|
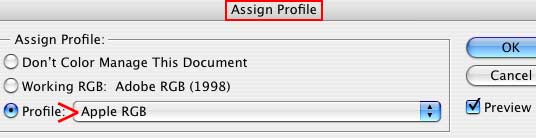
5) Further, return to the five Un-Tagged images opened under step 3, and:
- Edit> ASSIGN PROFILE "AppleRGB" to the Untagged Apple RGB image;
- Edit>ASSIGN PROFILE "sRGB" to the Untagged sRGB;
- Edit>ASSIGN PROFILE "ProPhoto RGB" to the Untagged ProPhoto RGB;
- Edit>ASSIGN PROFILE 'Whacked RGB" to the Untagged Whacked RGB:
(If you don't have the WhackedRGB.icc profile installed, you may not be able to Assign it in Photoshop, just disregard step #5D if it is too much trouble to install its .icc profile — Mac users just drag the WhackedRGB.icc icon from the downloaded folder into: Hard Drive> Library> ColorSync: Profiles and it should become available.)
- The Untagged Adobe RGB image should already be displaying properly (Source Space equals Working Space) so leave it as is for the Conclusion.
|
| CONCLUSION of Assign-Convert |
Now ALL TEN TEST FILES ARE DISPLAYING IDENTICALLY (correctly) because:
- We HONORED the embedded profile on the five Tagged files (step 4).
- We Edit> ASSIGNED (the correct) Profiles to the Untagged Apple RGB, ProPhoto RGB, sRGB and Whacked RGB files (step 5).
- We applied "Don't Color Manage this Document" to the Untagged AdobeRGB image which EQUALS Photoshop's Working RGB (step 3).
If I've done my journalistic and tutorial job correctly, my point should be becoming obvious — with a review and further practice — my core point should be crystal clear:
Photoshop must be told the Source Document's true Source Profile or it will change the file's color mapping and skew all color Conversions, including Source> Monitor & Source> Print Space.
|
| THIS IS ANOTHER ENLIGHTENING EXERCISE about how ICC profiles work in Photoshop: |
Open any file in Photoshop:
(Older versions of Photoshop 6, 7, 8 CS1 use: Image> Mode> Assign Profile)
- Edit> Assign Profile: sRGB
- Edit> Assign Profile: Adobe RGB
- Edit> Assign Profile: Apple RGB
- Edit> Assign Profile: ProPhoto RGB
- Edit> Assign Profile: Monitor Profile
- Edit> Assign Profile: Whacked RGB
(If you don't have the WhackedRGB.icc profile installed, you may not be able to Assign it in Photoshop, just disregard step #6 if it is too much trouble to install its .icc profile — Mac users just drag the WhackedRGB.icc icon from the downloaded folder into: Hard Drive> Library> ColorSync: Profiles and it should become available.)

NOTICE THE FILE CHANGES APPEARANCE because ASSIGN Profile tells Photoshop to re-define, to re-map, to re-base its Conversion to Monitor RGB, on different "numbers," different color "maps" (thereby changing, altering Photoshop's interpretation of the original Source File).
- IN A GENERAL WORKING SENSE:
The colors changing on screen - under ASSIGN Profile - effectively illustrate HOW, Assigning different profiles actually changes the file (by remapping, redefining the file's Color Space).
IN THE ACTUAL, FACTUAL, TECHNICAL SENSE:
Assigning different profiles - in fact - does NOT change the actual file, as Bruce Fraser so eloquently enlightened us.
Bruce Fraser summed this behavior up in an Adobe forum:
"You could change profiles a thousand times via Assign Profile and the image would not degrade... inasmuch as the numbers in the file wouldn't change, this is true.
"But it would display incorrectly, and convert to any other space incorrectly, so it's fair to say that while the integrity of the data hasn't been compromised, and you can rescue the file by assigning the correct profile, for all practical purposes, it's hosed."
BTW, Assigning the above six profiles is "fishing" around for the best profile technique - Bruce Fraser's Mystery Meat analogy - we ASSIGN various profiles, ColorSpaces until we get the best color on a calibrated monitor, then Image> Mode> Convert to (desired) Profile....
|
| Not to trick you, but :) |
Open one of the Tagged PDI files in Photoshop (use the embedded profile):
- Edit> Convert to Profile: sRGB
- Edit> Convert to Profile: Adobe RGB
- Edit> Convert to Profile: Apple RGB
- Edit> Convert to Profile: ProPhoto RGB
- Edit> Assign Profile: Monitor Profile
- Edit> Convert to Profile: Whacked RGB
(if you don't have the WhackedRGB.icc profile installed, you may not be able to Convert to it in Photoshop, just disregard step #6 if it is too much trouble to install its .icm profile — Mac users just drag the WhackedRGB.icc icon from the downloaded folder into: Hard Drive> Library> ColorSync: Profiles and it should become available.)
Older versions of Photoshop 6, 7, 8 CS1 use: Image> Mode> Convert to Profile.
NOTICE THE FILE DOES NOT CHANGE APPEARANCE (except for possible minor gamut differences between Spaces) because Photoshop knows the Source Space, and is merely CONVERTING the Source Space to a Target Space -- the SourceSpace> MonitorRGB conversion is happening on-the-fly automatically behind-the-scenes, (Photoshop is "PROOFING" the source document 'accurately' on the monitor in real time).
The fact that the color does not change on screen under CONVERT effectively illustrates HOW Converting source profiles maintains the faithful color appearance even though the source file's Color Space is changed, remapped, altered.
|
"If the facts don't fit the theory,
change the facts."
- Albert Einstein
|
|
To most effectively observe how profiles work and interact with color management systems using your color-managed Web browser:
PROOF my point HERE in your color-managed Safari and Firefox Web browsers — a side-by-side comparison tutorial of tagged and untagged AppleRGB, sRGB, Adobe RGB (1998), ProPhotoRGB and visual demonstrations about how color management works.
For HELP with monitor calibration, troubleshooting and evaluating monitor profiles.
|
| My iPhoto Test images set up for you in a color-managed picture viewer (Adobe Bridge screen capture) |
NOTE:
- For best results, view this image in color-managed web browser like (free download) SAFARI or a recent version of FireFox, or Photoshop.
- All the tagged files the left column appear identical in (Bridge read the embedded profile and correctly Converted them to Monitor RGB for True Color display).
- The un-tagged set in the right column all had Bridge's default profile (sRGB) automatically applied/assumed/assigned, so they all displayed incorrectly except for sRGB (which is Bridge's default profile).
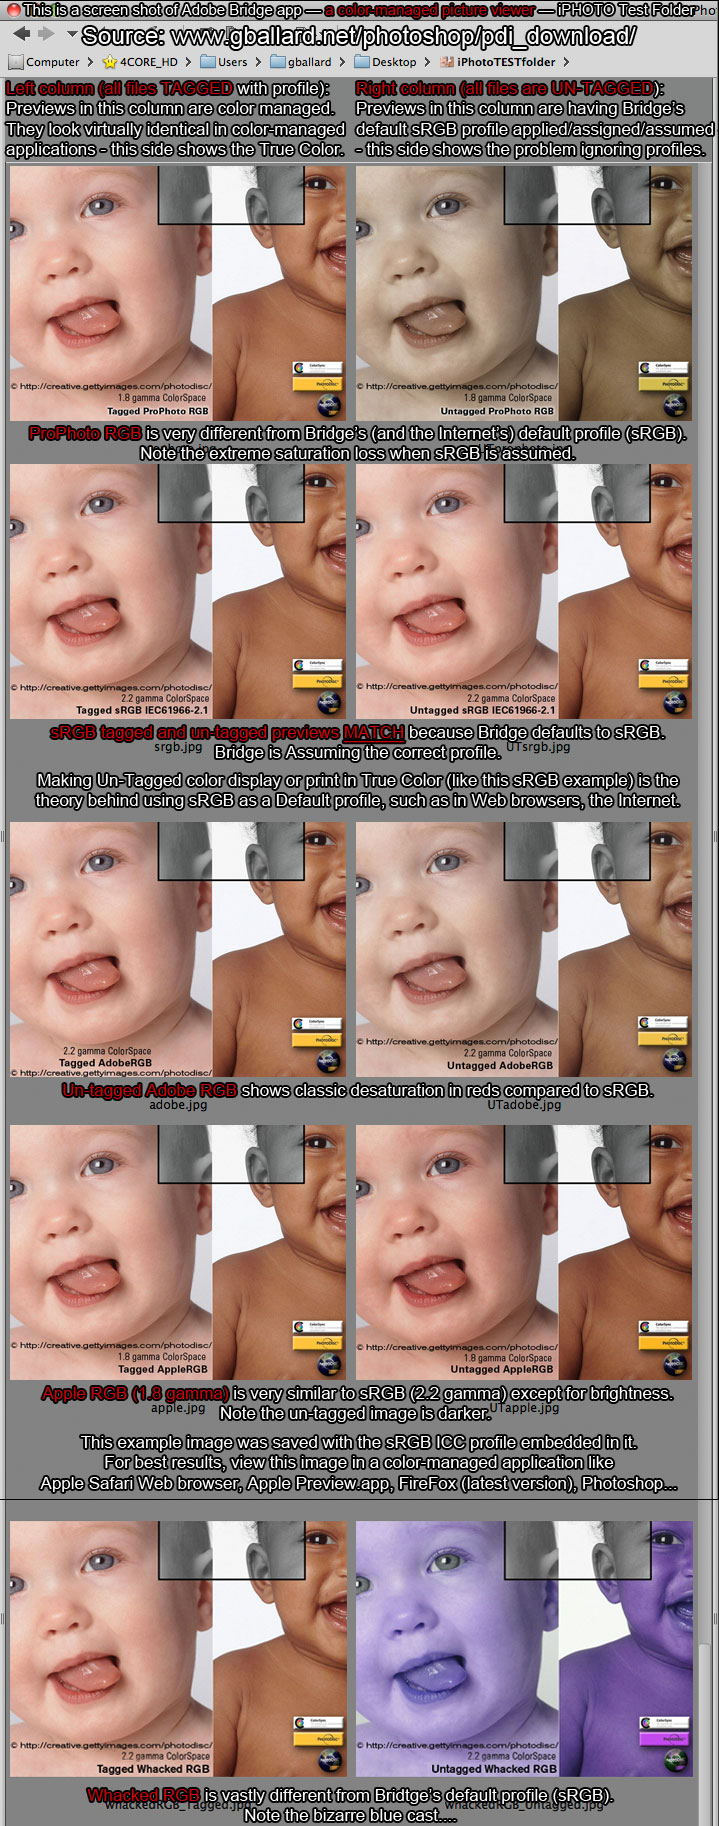
If you are still trying to understand how ICC Profiles work — Save the above image to your Desktop — Open it in Photoshop (use the embedded profile: sRGB) — then Edit> Assign Profile: ProPhoto RGB — observe the color chaos (all the photos go super saturtated in the reds EXECPT for the Un-Tagged ProPhoto RGB, it snaps back to True Color).
If you want to see an even more bizarre example of Assign Profile in action — Save the above image to your Desktop — Open it in Photoshop (use the embedded profile: sRGB) — then Edit> Assign Profile: Wacked RGB.
- For this to work, you will likely need to have already installed the "WhackedRGB.icc" profile (available in the DOWNLOAD PDI Target(WhackedRGB)ONLY.zip (4MB) for PC and Mac OS-X).
|
|
Page last updated July 2025
by: ©2004-2012 G. BALLARD • www.gballard.com
Note: G. BALLARD prefers a shredding if he is wrong or unclear.
Please read the www.gballard.net site USER AGREEMENT, and site DISCLAIMER for legal issues regarding your use of the www.gballard.net site.
G. Ballard, www.gballard.net, receives no compensation from, and is not affiliated with Adobe Systems, Inc., or Apple Computers.
|
|